Up to date
This page is up to date for Godot 4.2.
If you still find outdated information, please open an issue.
리소스
노드와 리소스
지금까지 우리는 Godot에서 동작을 코딩하는 데 쓰이고 엔진 대부분의 기능이 의존하는 Node 클래스에 초점을 두었습니다. 이와 마찬가지로 중요한 데이터 타입: Resource가 있습니다.
노드(Node)는 스프라이트, 3D 모델, 물리 시뮬레이션, 유저 인터페이스 정렬 등의 기능을 제공합니다. 리소스(Resource)는 데이터 컨테이너입니다. 리소스 자체적으로는 아무 것도 하지 않습니다. 대신 노드는 리소스에 포함된 데이터를 사용합니다.
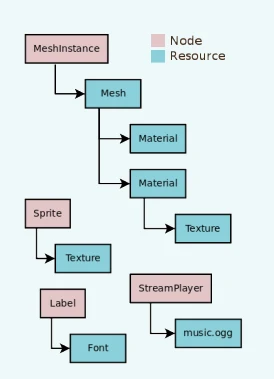
Anything Godot saves or loads from disk is a resource. Be it a scene (a .tscn
or an .scn file), an image, a script... Here are some Resource examples:
엔진이 디스크에서 리소스를 불러올 때 항상 한 번만 불러옵니다. 해당 리소스의 복사본이 이미 메모리에 있는 경우 리소스를 다시 불러오려고 하면 매번 같은 복사본을 반환합니다. 리소스에는 데이터만 포함되어 있으므로 리소스를 복제할 필요가 없습니다.
노드 또는 리소스와 같은 모든 개체는 속성을 내보낼 수 있습니다. String, integer, Vector2 등과 같은 많은 타입의 속성 중 하나가 리소스가 될 수 있습니다. 즉, 노드와 리소스 모두 리소스를 속성으로 포함할 수 있습니다:
외부(External) vs 내장(built-in)
리소스를 저장하는 두 가지 방법이 있습니다. 두 가지 방법은 다음과 같습니다:
씬의 외부 에 개별 파일로 저장.
.tscn이나.scn파일 안에 내장된 채로 저장.
To be more specific, here's a Texture2D in a Sprite2D node:
Clicking the resource preview allows us to view the resource's properties.
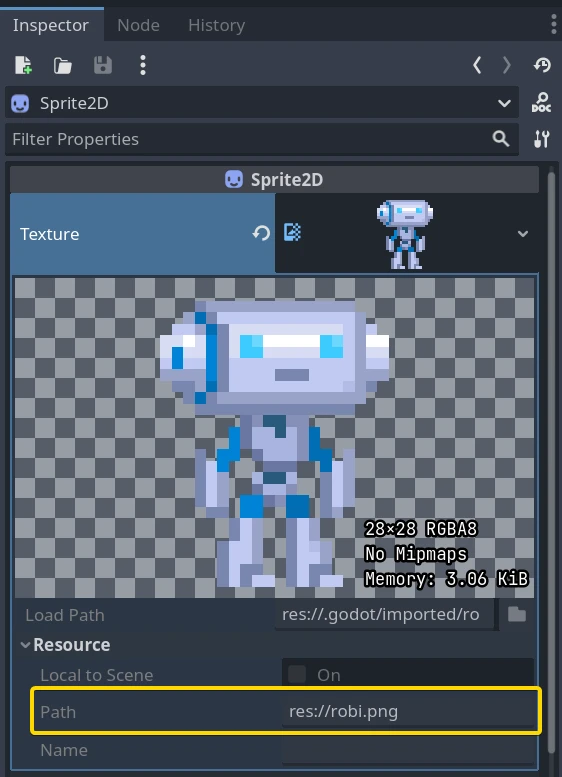
Path 속성은 리소스의 경로를 알려줍니다. 이 경우 리소스는 robi.png라는 PNG 이미지에서 가져옵니다. 이와 같이 파일에서 리소스를 불러오는 경우 외부 리소스라고 합니다. Path를 지우거나 비워 두면 내장 리소스가 됩니다.
내장 리소스와 외부 리소스 간의 전환은 씬을 저장할 때 발생합니다. 위의 예시에서 경로 "res://robi.png"를 지우고 저장한다면, Godot는 .tscn 씬 파일 안에 이미지를 저장합니다.
참고
내장 리소스로 저장하더라도 씬을 여러 번 인스턴스화하면 엔진은 해당 복사본을 하나만 불러옵니다.
코드에서 리소스 불러오기
코드에서 리소스를 불러오는 방법은 두 가지가 있습니다. 첫 번째로, 언제든지 load() 함수를 사용해 불러올 수 있습니다:
func _ready():
    # Godot loads the Resource when it reads this very line.
    var imported_resource = load("res://robi.png")
    $sprite.texture = imported_resource
public override void _Ready()
{
    // Godot loads the Resource when it executes this line.
    var texture = GD.Load<Texture>("res://Robi.png");
    var sprite = GetNode<Sprite2D>("sprite");
    sprite.Texture = texture;
}
You can also preload resources. Unlike load, this function will read the
file from disk and load it at compile-time. As a result, you cannot call preload
with a variable path: you need to use a constant string.
func _ready():
    # Godot loads the resource at compile-time
    var imported_resource = preload("res://robi.png")
    get_node("sprite").texture = imported_resource
// 'preload()' is unavailable in C Sharp.
씬 불러오기
Scenes are also resources, but there is a catch. Scenes saved to disk are resources of type PackedScene. The scene is packed inside a Resource.
To get an instance of the scene, you have to use the PackedScene.instantiate() method.
func _on_shoot():
        var bullet = preload("res://bullet.tscn").instantiate()
        add_child(bullet)
private PackedScene _bulletScene = GD.Load<PackedScene>("res://Bullet.tscn");

private void OnShoot()
{
    Node bullet = _bulletScene.Instantiate();
    AddChild(bullet);
}
이 메서드는 씬의 계층 구조에 노드를 만들고, 구성하고, 씬의 루트 노드를 반환합니다. 그런 다음 이것을 다른 노드의 자식으로 추가할 수 있습니다.
The approach has several advantages. As the PackedScene.instantiate() function is fast, you can create new enemies, bullets, effects, etc. without having to load them again from disk each time. Remember that, as always, images, meshes, etc. are all shared between the scene instances.
리소스 해제(Free)하기
When a Resource is no longer in use, it will automatically free itself. Since, in most cases, Resources are contained in Nodes, when you free a node, the engine frees all the resources it owns as well if no other node uses them.
여러분만의 리소스 만들기
Godot의 어떤 오브젝트나 마찬가지로 유저는 리소스를 스크립트로 작성할 수도 있습니다. 리소스 스크립트는 개체 속성과 직렬화된 텍스트 또는 이진 데이터(/.tres, /.res) 간에 자유롭게 변환하는 기능을 상속받습니다. 또한 참조 타입으로부터 참조 카운팅(reference-counting) 메모리 관리를 상속받습니다.
This comes with many distinct advantages over alternative data structures, such as JSON, CSV, or custom TXT files. Users can only import these assets as a Dictionary (JSON) or as a FileAccess to parse. What sets Resources apart is their inheritance of Object, RefCounted, and Resource features:
상수를 정의할 수 있으므로 다른 데이터 필드나 오브젝트의 상수가 필요하지 않습니다.
속성에 대한 setter/getter 메서드를 포함한 메서드를 정의할 수 있습니다. 이를 통해 기본 데이터를 추상화하고 캡슐화할 수 있습니다. 리소스 스크립트의 구조를 변경해야 하는 경우 리소스를 사용하는 게임을 변경할 필요가 없습니다.
시그널을 정의할 수 있으므로 리소스가 관리하는 데이터의 변경 사항에 대한 응답을 트리거할 수 있습니다.
정의된 속성이 있으므로 유저는 자신의 데이터가 존재한다는 것을 100% 알 수 있습니다.
리소스 자동 직렬화 및 역직렬화는 Godot 엔진에 내장된 기능입니다. 유저는 리소스 파일의 데이터를 가져오거나 내보내기 위해 사용자 정의 로직을 구현할 필요가 없습니다.
리소스는 하위 리소스를 재귀적으로 직렬화할 수도 있습니다. 이는 유저가 훨씬 더 정교한 데이터 구조를 설계할 수 있음을 의미합니다.
유저는 리소스를 버전 관리에 적합한 텍스트 파일(*.tres)로 저장할 수 있습니다. 게임을 내보낼 때 Godot는 리소스 파일을 바이너리 파일(*.res)로 직렬화해서 속도와 압축률을 높입니다.
Godot 엔진의 인스펙터(Inspector)는 리소스 파일을 즉시 렌더링하고 편집합니다. 따라서 사용자는 데이터를 시각화하거나 편집하기 위해 사용자 정의 로직을 구현할 필요가 없는 경우가 많습니다. 이렇게 하려면 파일시스템(FileSystem) 독에서 리소스 파일을 두 번 클릭하거나 인스펙터(Inspector)에서 폴더 아이콘을 클릭하고 대화 상자에서 파일을 여세요.
기본 리소스 외에 다른 리소스 타입을 확장할 수 있습니다.
Godot의 인스펙터(Inspecter)에서는 커스텀 리소스를 쉽게 만들 수 있습니다.
인스펙터(Inspecter)에서 일반 Resource 오브젝트를 만듭니다. 스크립트가 해당 타입을 확장하는 동안 리소스를 파생하는 타입일 수도 있습니다.
인스펙터(Inspecter)에서
script속성을 여러분의 스크립트로 설정합니다.
인스펙터(Inspector)는 이제 여러분의 리소스 스크립트의 사용자 정의 속성을 표시합니다. 해당 값을 편집하고 리소스를 저장하면 인스펙터(Inspector)는 사용자 정의 속성도 직렬화합니다! 인스펙터(Inspector)에서 리소스를 저장하려면 인스펙터(Inspector)의 툴 메뉴(오른쪽 위)를 클릭하고 "저장" 또는 "다른 이름으로 저장..."을 선택하세요.
If the script's language supports script classes, then it streamlines the process. Defining a name for your script alone will add it to the Inspector's creation dialog. This will auto-add your script to the Resource object you create.
Let's see some examples.
Create a Resource and name it bot_stats.
It should appear in your file tab with the full name bot_stats.tres.
Without a script, it's useless, so let's add some data and logic!
Attach a script to it named bot_stats.gd (or just create a new script, and then drag it to it).
extends Resource

@export var health: int
@export var sub_resource: Resource
@export var strings: PackedStringArray

# Make sure that every parameter has a default value.
# Otherwise, there will be problems with creating and editing
# your resource via the inspector.
func _init(p_health = 0, p_sub_resource = null, p_strings = []):
    health = p_health
    sub_resource = p_sub_resource
    strings = p_strings
// BotStats.cs
using Godot;

namespace ExampleProject
{
    public partial class BotStats : Resource
    {
        [Export]
        public int Health { get; set; }

        [Export]
        public Resource SubResource { get; set; }

        [Export]
        public string[] Strings { get; set; }

        // Make sure you provide a parameterless constructor.
        // In C#, a parameterless constructor is different from a
        // constructor with all default values.
        // Without a parameterless constructor, Godot will have problems
        // creating and editing your resource via the inspector.
        public BotStats() : this(0, null, null) {}

        public BotStats(int health, Resource subResource, string[] strings)
        {
            Health = health;
            SubResource = subResource;
            Strings = strings ?? System.Array.Empty<string>();
        }
    }
}
Now, create a CharacterBody3D, name it Bot, and add the following script to it:
extends CharacterBody3D

@export var stats: Resource

func _ready():
    # Uses an implicit, duck-typed interface for any 'health'-compatible resources.
    if stats:
        stats.health = 10
        print(stats.health)
        # Prints "10"
// Bot.cs
using Godot;

namespace ExampleProject
{
    public partial class Bot : CharacterBody3D
    {
        [Export]
        public Resource Stats;

        public override void _Ready()
        {
            if (Stats is BotStats botStats)
            {
                GD.Print(botStats.Health); // Prints '10'.
            }
        }
    }
}
Now, select the CharacterBody3D node which we named bot, and drag&drop the bot_stats.tres resource onto the Inspector. It should print 10! Obviously, this setup can be used for more advanced features than this, but as long you really understand how it all worked, you should figure out everything else related to Resources.
참고
리소스 스크립트는 Unity의 ScriptableObjects와 유사합니다. 인스펙터(Inspector)는 커스텀 리소스를 위한 내장 지원을 제공합니다. 원한다면 유저만의 Control 기반 도구 스크립트를 디자인하고 이를 EditorPlugin과 결합해서 데이터에 대한 커스텀 시각화 및 에디터를 만들 수도 있습니다.
Unreal Engine's DataTables and CurveTables are also easy to recreate with Resource scripts. DataTables are a String mapped to a custom struct, similar to a Dictionary mapping a String to a secondary custom Resource script.
# bot_stats_table.gd
extends Resource

const BotStats = preload("bot_stats.gd")

var data = {
    "GodotBot": BotStats.new(10), # Creates instance with 10 health.
    "DifferentBot": BotStats.new(20) # A different one with 20 health.
}

func _init():
    print(data)
using Godot;

public partial class BotStatsTable : Resource
{
    private Godot.Dictionary<string, BotStats> _stats = new Godot.Dictionary<string, BotStats>();

    public BotStatsTable()
    {
        _stats["GodotBot"] = new BotStats(10); // Creates instance with 10 health.
        _stats["DifferentBot"] = new BotStats(20); // A different one with 20 health.
        GD.Print(_stats);
    }
}
Instead of inlining the Dictionary values, one could also, alternatively:
Import a table of values from a spreadsheet and generate these key-value pairs.
Design a visualization within the editor and create a plugin that adds it to the Inspector when you open these types of Resources.
CurveTable은 float 배열 또는 Curve/Curve2D 리소스 개체에 매핑된다는 점을 제외하고는 동일합니다.
경고
리소스 파일(*.tres/*.res)은 파일에서 사용하는 스크립트의 경로를 저장합니다. 리소스를 불러오면 이 스크립트를 해당 타입의 확장으로 가져와 로드합니다. 이는 하위 클래스, 즉 스크립트의 내부 클래스(예: GDScript에서 class 키워드 사용)를 할당할 수 없다는 의미입니다. Godot는 스크립트 서브클래스의 사용자 정의 속성을 적절하게 직렬화하지 않을 것입니다.
아래 예시에서, Godot는 Node 스크립트를 불러오고, Resource를 확장(extend)하지 않는지 확인한 다음, 이 경우 타입이 호환되지 않으므로 스크립트가 Resource 오브젝트를 불러오는 데 실패했다고 판단합니다.
extends Node

class MyResource:
    extends Resource
    @export var value = 5

func _ready():
    var my_res = MyResource.new()

    # This will NOT serialize the 'value' property.
    ResourceSaver.save(my_res, "res://my_res.tres")
using Godot;

public partial class MyNode : Node
{
    public partial class MyResource : Resource
    {
        [Export]
        public int Value { get; set; } = 5;
    }

    public override void _Ready()
    {
        var res = new MyResource();

        // This will NOT serialize the 'Value' property.
        ResourceSaver.Save(res, "res://MyRes.tres");
    }
}