Up to date
This page is up to date for Godot 4.2.
If you still find outdated information, please open an issue.
Creating the enemy
이제 우리의 플레이어가 피할 몹을 만들 차례입니다. 이들의 행동은 그리 복잡하진 않을 것입니다: 몹이 아무렇게나 화면의 가장자리에서 나타나고 무작위 방향을 선택해 직선으로 이동합니다.
먼저 Mob 장면을 생성할 것입니다. 그런 다음 인스턴스화해서 게임에서 원하는 수의 독립적인 몹을 생성할 수 있습니다.
노드 설정하기
Click Scene -> New Scene from the top menu and add the following nodes:
RigidBody2D (
Mob으로 이름지음)
플레이어 씬에서 한 것과 마찬가지로, 자식이 선택되지 않도록 설정하는 것을 잊지마세요.
Select the Mob node and set its Gravity Scale
property in the RigidBody2D
section of the inspector to 0.
This will prevent the mob from falling downwards.
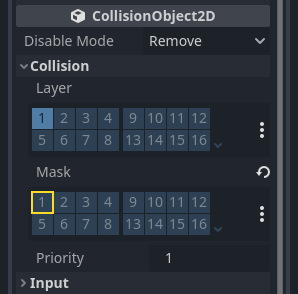
In addition, under the CollisionObject2D
section just beneath the RigidBody2D section,
expand the Collision group and
uncheck the 1 inside the Mask property.
This will ensure the mobs do not collide with each other.
Set up the AnimatedSprite2D like you did for the
player. This time, we have 3 animations: fly, swim, and walk. There
are two images for each animation in the art folder.
The Animation Speed property has to be set for each individual animation. Adjust it to 3 for all 3 animations.
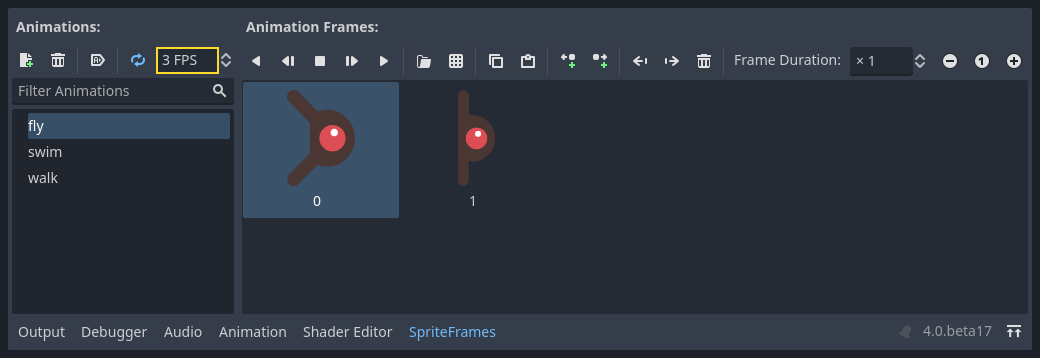
You can use the "Play Animation" buttons on the right of the Animation Speed input field to preview your animations.
몬스터가 다양해질 수 있도록 이 애니메이션 중 하나를 무작위로 선택할 것입니다.
Like the player images, these mob images need to be scaled down. Set the
AnimatedSprite2D's Scale property to (0.75, 0.75).
As in the Player scene, add a CapsuleShape2D for the collision. To align
the shape with the image, you'll need to set the Rotation property
to 90 (under "Transform" in the Inspector).
씬을 저장하세요.
적 스크립트
Add a script to the Mob like this:
extends RigidBody2D
using Godot;

public partial class Mob : RigidBody2D
{
    // Don't forget to rebuild the project.
}
Now let's look at the rest of the script. In _ready() we play the animation
and randomly choose one of the three animation types:
func _ready():
    var mob_types = $AnimatedSprite2D.sprite_frames.get_animation_names()
    $AnimatedSprite2D.play(mob_types[randi() % mob_types.size()])
public override void _Ready()
{
    var animatedSprite2D = GetNode<AnimatedSprite2D>("AnimatedSprite2D");
    string[] mobTypes = animatedSprite2D.SpriteFrames.GetAnimationNames();
    animatedSprite2D.Play(mobTypes[GD.Randi() % mobTypes.Length]);
}
First, we get the list of animation names from the AnimatedSprite2D's sprite_frames
property. This returns an Array containing all three animation names: ["walk",
"swim", "fly"].
그런 다음 목록에서 이 이름 중 하나를 선택하려면 0과 2 사이의 임의의 숫자를 선택해야 합니다(배열 인덱스는 0에서 시작). randi() % n은 0과 n-1 사이의 임의의 정수를 선택합니다.
The last piece is to make the mobs delete themselves when they leave the screen.
Connect the screen_exited() signal of the VisibleOnScreenNotifier2D node
to the Mob and add this code:
func _on_visible_on_screen_notifier_2d_screen_exited():
    queue_free()
private void OnVisibleOnScreenNotifier2DScreenExited()
{
    QueueFree();
}
이것으로 Mob 씬이 완성되었습니다.
With the player and enemies ready, in the next part, we'll bring them together in a new scene. We'll make enemies spawn randomly around the game board and move forward, turning our project into a playable game.