Up to date
This page is up to date for Godot 4.2.
If you still find outdated information, please open an issue.
Heads up display
The final piece our game needs is a User Interface (UI) to display things like score, a "game over" message, and a restart button.
Create a new scene, click the "Other Node" button and add a CanvasLayer node named
HUD. "HUD" stands for "heads-up display", an informational display that
appears as an overlay on top of the game view.
CanvasLayer 노드는 게임 위 레이어에 우리의 UI 요소들을 그릴수 있게 해주고, 이로써 보여지는 정보가 플레이어나 몹과 같은 게임 요소들에 의해 가려지지 않게 만듭니다.
HUD는 다음 정보를 표시해야 합니다:
ScoreTimer에 의해 변경되는 점수(Score)."Game Over"나 "Get Ready!"와 같은 메시지
게임을 시작하기 위한 "Start" 버튼.
UI 요소의 기초가 되는 노드는 Control입니다. UI를 만들기 위해, 우리는 두 가지 타입의 Control 노드: Label과 Button을 사용할 것입니다.
다음 노드들을 HUD 노드의 자식으로 추가하세요:
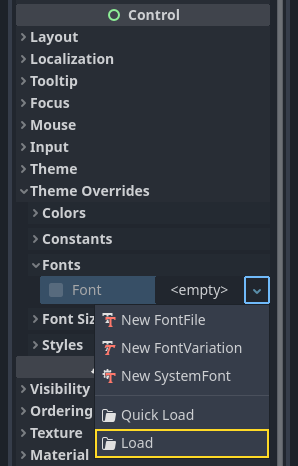
ScoreLabel을 클릭하고 인스펙터(Inspecter)의 Text 필드에 숫자를 입력하세요. Control 노드의 기본 폰트는 작아서 크기 조정이 잘 되지 않습니다. 게임 애셋에는 "Xolonium-Regular.ttf"라는 폰트 파일이 있습니다. 이 폰트를 사용하려면, 각 Control 노드마다 다음과 같이 하세요:
Under "Theme Overrides > Fonts", choose "Load" and select the "Xolonium-Regular.ttf" file.
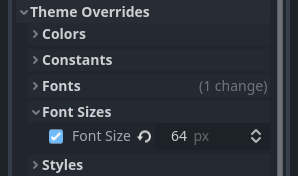
The font size is still too small, increase it to 64 under "Theme Overrides > Font Sizes".
Once you've done this with the ScoreLabel, repeat the changes for the Message and StartButton nodes.
참고
Anchors: Control nodes have a position and size,
but they also have anchors. Anchors define the origin -
the reference point for the edges of the node.
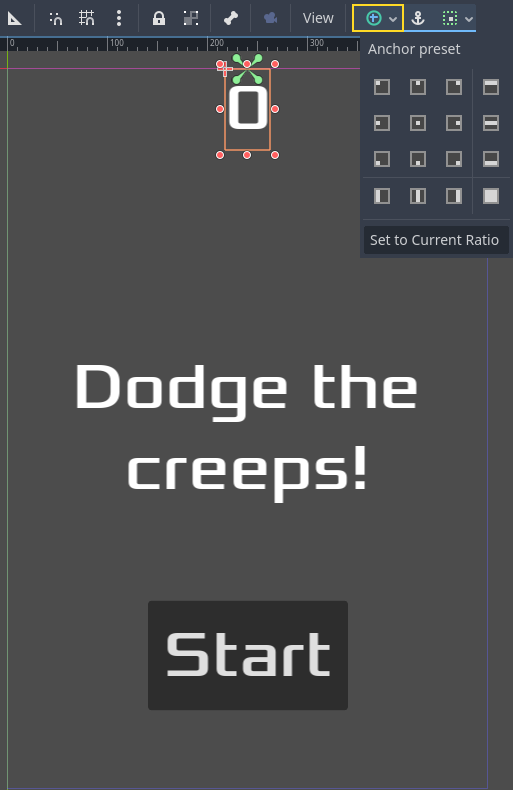
Arrange the nodes as shown below. You can drag the nodes to place them manually, or for more precise placement, use "Anchor Presets".
ScoreLabel
Add the text
0.Set the "Horizontal Alignment" and "Vertical Alignment" to
Center.Choose the "Anchor Preset"
Center Top.
메시지
Add the text
Dodge the Creeps!.Set the "Horizontal Alignment" and "Vertical Alignment" to
Center.Set the "Autowrap Mode" to
Word, otherwise the label will stay on one line.Under "Control - Layout/Transform" set "Size X" to
480to use the entire width of the screen.Choose the "Anchor Preset"
Center.
메인에 HUD를 연결하기
이제 HUD 씬 만들기가 끝났으니 저장하고 다시 Main으로 돌아가세요. Player 씬에서 했듯이 HUD 씬을 Main에 인스턴스화하고, 트리의 맨 아래에 배치하세요. 모든 트리는 다음처럼 보여야 하므로, 놓친 것이 없는지 확인해보세요:

이제 HUD 기능을 Main 스크립트에 연결할 것입니다. 여기에는 Main 씬에 추가적인 것들이 요구됩니다:
In the Node tab, connect the HUD's start_game signal to the new_game()
function of the Main node by clicking the "Pick" button in the "Connect a Signal"
window and selecting the new_game() method or type "new_game" below "Receiver Method"
in the window. Verify that the green connection icon now appears next to
func new_game() in the script.
new_game()에서, 점수 화면을 업데이트하고 "Get Ready" 메시지를 보이게 합니다:
$HUD.update_score(score)
$HUD.show_message("Get Ready")
var hud = GetNode<HUD>("HUD");
hud.UpdateScore(_score);
hud.ShowMessage("Get Ready!");
game_over()에서는, 해당 HUD 함수를 호출해야 합니다:
$HUD.show_game_over()
GetNode<HUD>("HUD").ShowGameOver();
Finally, add this to _on_score_timer_timeout() to keep the display in sync
with the changing score:
$HUD.update_score(score)
GetNode<HUD>("HUD").UpdateScore(_score);
경고
Remember to remove the call to new_game() from
_ready() if you haven't already, otherwise
your game will start automatically.
Now you're ready to play! Click the "Play the Project" button. You will be asked
to select a main scene, so choose main.tscn.
오래된 적들 제거하기
"Game Over"까지 플레이한 다음 바로 새 게임을 시작하면 이전 게임의 크립이 화면에 계속 표시될 수 있습니다. 새 게임이 시작될 때 모두 사라지면 더 좋을 것입니다. 우리는 모든 몹에게 스스로 제거하도록 지시할 방법이 필요합니다. "그룹(group)" 기능으로 이 작업을 수행할 수 있습니다.
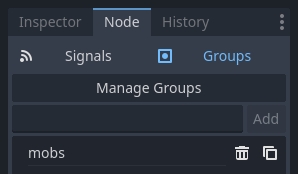
Mob 씬에서 루트 노드를 선택하고 인스펙터 옆에 있는 "노드(Node)" 탭을 클릭하세요(노드의 시그널을 찾을 수 있는 동일한 위치). "시그널(Signals)" 옆에 있는 "그룹(Groups)"을 클릭하고 새 그룹 이름을 입력하고 "추가(Add)"를 클릭하세요.
Now all mobs will be in the "mobs" group. We can then add the following line to
the new_game() function in Main:
get_tree().call_group("mobs", "queue_free")
// Note that for calling Godot-provided methods with strings,
// we have to use the original Godot snake_case name.
GetTree().CallGroup("mobs", Node.MethodName.QueueFree);
call_group() 함수는 그룹의 모든 노드에서 지정된 함수를 호출합니다. 이 경우 모든 몹에게 자신을 삭제하도록 지시합니다.
The game's mostly done at this point. In the next and last part, we'll polish it a bit by adding a background, looping music, and some keyboard shortcuts.