Up to date
This page is up to date for Godot 4.2.
If you still find outdated information, please open an issue.
2D 이동 개요
소개
Every beginner has been there: "How do I move my character?" Depending on the style of game you're making, you may have special requirements, but in general the movement in most 2D games is based on a small number of designs.
We'll use CharacterBody2D for these examples, but the principles will apply to other node types (Area2D, RigidBody2D) as well.
설정
Each example below uses the same scene setup. Start with a CharacterBody2D with two
children: Sprite2D and CollisionShape2D. You can use the Godot icon ("icon.png")
for the Sprite2D's texture or use any other 2D image you have.
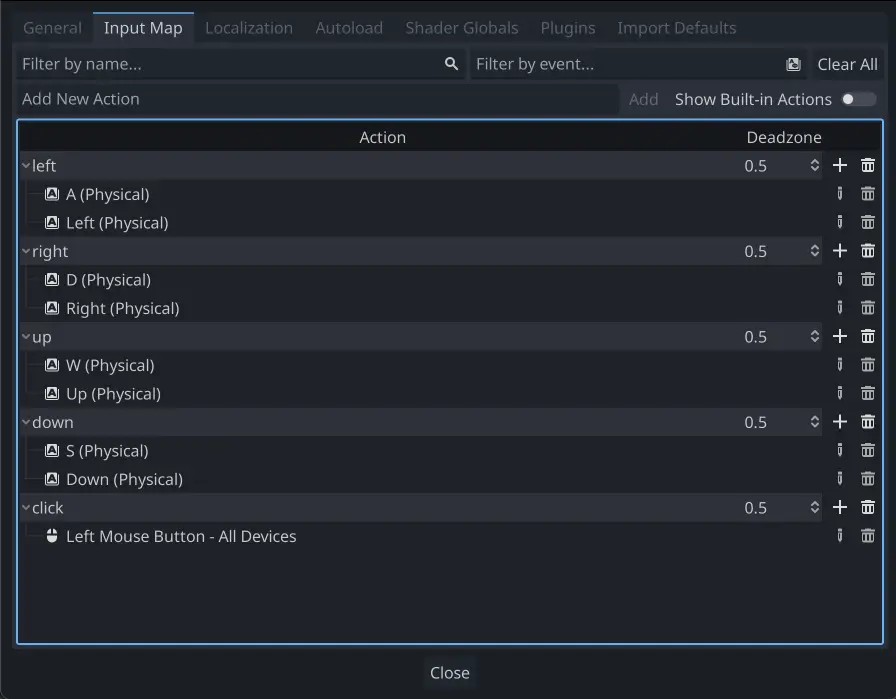
프로젝트 -> 프로젝트 설정 을 열고 "입력 설정" 탭을 선택합니다. 다음의 입력 액션들을 추가하세요 (see InputEvent for details):
8 방향 이동
이 시나리오에서는 사용자가 4 방향의 키들(위/왼쪽/아래/오른쪽 또는 W/A/S/D)을 누르고 선택된 방향으로 움직였으면 합니다. "8 방향 이동" 명칭은 동시에 두 키를 눌러서 플레이어가 대각선으로 움직이게 되는 것에서 유래합니다.
Add a script to the character body and add the following code:
extends CharacterBody2D

@export var speed = 400

func get_input():
    var input_direction = Input.get_vector("left", "right", "up", "down")
    velocity = input_direction * speed

func _physics_process(delta):
    get_input()
    move_and_slide()
using Godot;

public partial class Movement : CharacterBody2D
{
    [Export]
    public int Speed { get; set; } = 400;

    public void GetInput()
    {

        Vector2 inputDirection = Input.GetVector("left", "right", "up", "down");
        Velocity = inputDirection * Speed;
    }

    public override void _PhysicsProcess(double delta)
    {
        GetInput();
        MoveAndSlide();
    }
}
In the get_input() function, we use Input get_vector() to check for the
four key events and sum return a direction vector.
We can then set our velocity by multiplying this direction vector, which has a
length of 1, by our desired speed.
팁
벡터 수학을 사용해 본 적이 없거나 재교육이 필요한 경우 벡터 에서 Godot 내 벡터 사용에 대한 설명을 볼 수 있습니다.
참고
If the code above does nothing when you press the keys, double-check that you've set up input actions correctly as described in the 설정 part of this tutorial.
회전 + 이동
이러한 이동의 유형은 때때로 "Asteroids-style"이라 불립니다. 왜냐하면 고전 아케이드 게임 Asteroids 작동 방식과 닮았기 때문입니다. 왼쪽 또는 오른쪽을 누르면 캐릭터가 회전합니다. 반면에 위 또는 아래를 누르면 보고 있는 방향에 대햐여 전진 하거나 후진합니다.

extends CharacterBody2D

@export var speed = 400
@export var rotation_speed = 1.5

var rotation_direction = 0

func get_input():
    rotation_direction = Input.get_axis("left", "right")
    velocity = transform.x * Input.get_axis("down", "up") * speed

func _physics_process(delta):
    get_input()
    rotation += rotation_direction * rotation_speed * delta
    move_and_slide()
using Godot;

public partial class Movement : CharacterBody2D
{
    [Export]
    public int Speed { get; set; } = 400;

    [Export]
    public float RotationSpeed { get; set; } = 1.5f;

    private float _rotationDirection;

    public void GetInput()
    {
        _rotationDirection = Input.GetAxis("left", "right");
        Velocity = Transform.X * Input.GetAxis("down", "up") * Speed;
    }

    public override void _PhysicsProcess(double delta)
    {
        GetInput();
        Rotation += _rotationDirection * RotationSpeed * (float)delta;
        MoveAndSlide();
    }
}
Here we've added two variables to track our rotation direction and speed.
The rotation is applied directly to the body's rotation property.
To set the velocity, we use the body's transform.x which is a vector pointing
in the body's "forward" direction, and multiply that by the speed.
회전 + 이동 (마우스)
이번 동작 방식은 이전 동작의 변형입니다. 이번에는 키보드 대신 마우스 위치에 의해 방향이 정해집니다. 캐릭터는 항상 마우스 포인터를 봅니다("look at"). 그러나 전방/후진 입력은 동일하게 유지됩니다.
extends CharacterBody2D

@export var speed = 400

func get_input():
    look_at(get_global_mouse_position())
    velocity = transform.x * Input.get_axis("down", "up") * speed

func _physics_process(delta):
    get_input()
    move_and_slide()
using Godot;

public partial class Movement : CharacterBody2D
{
    [Export]
    public int Speed { get; set; } = 400;

    public void GetInput()
    {
        LookAt(GetGlobalMousePosition());
        Velocity = Transform.X * Input.GetAxis("down", "up") * Speed;
    }

    public override void _PhysicsProcess(double delta)
    {
        GetInput();
        MoveAndSlide();
    }
}
Here we're using the Node2D look_at() method to
point the player towards the mouse's position. Without this function, you
could get the same effect by setting the angle like this:
rotation = get_global_mouse_position().angle_to_point(position)
var rotation = GetGlobalMousePosition().AngleToPoint(Position);
클릭과 이동
이번 마지막 예제는 마우스만 사용하여 캐릭터를 제어합니다. 화면을 클릭하면 플레이어는 지정 위치로 움직입니다.

extends CharacterBody2D

@export var speed = 400

var target = position

func _input(event):
    if event.is_action_pressed("click"):
        target = get_global_mouse_position()

func _physics_process(delta):
    velocity = position.direction_to(target) * speed
    # look_at(target)
    if position.distance_to(target) > 10:
        move_and_slide()
using Godot;

public partial class Movement : CharacterBody2D
{
    [Export]
    public int Speed { get; set; } = 400;

    private Vector2 _target;

    public override void _Input(InputEvent @event)
    {
        if (@event.IsActionPressed("click"))
        {
            _target = GetGlobalMousePosition();
        }
    }

    public override void _PhysicsProcess(double delta)
    {
        Velocity = Position.DirectionTo(_target) * Speed;
        // LookAt(_target);
        if (Position.DistanceTo(_target) > 10)
        {
            MoveAndSlide();
        }
    }
}
Note the distance_to() check we make prior to movement. Without this test,
the body would "jitter" upon reaching the target position, as it moves
slightly past the position and tries to move back, only to move too far and
repeat.
Uncommenting the look_at() line will also turn the body to point in its
direction of motion if you prefer.
팁
This technique can also be used as the basis of a "following" character.
The target position can be that of any object you want to move to.
요약
당신은 이 코드 샘플들이 자신의 프로젝트 시작점으로서 유용하다는 것을 알게 될 것입니다. 자유롭게 그것들을 사용해서 무엇을 만들 수 있을 지 실험해보세요.
You can download this sample project here: 2d_movement_starter.zip