Up to date
This page is up to date for Godot 4.2.
If you still find outdated information, please open an issue.
Creating your first script
이번 레슨에서는 GDScript를 사용하여 Godot 아이콘이 원을 그리며 회전하는 첫 번째 스크립트를 코딩해 보겠습니다. 소개 <toc-learn-introduction>`에서 :ref:`를 언급했듯이, 당신이 프로그래밍 기초 지식이 있는 상태라고 가정합니다. 편의를 위해, 동일한 동작을 하는 C# 코드가 다른 탭에 있습니다.

더 보기
GDScript의 키워드와 문법에 대해 좀 더 알아보려면 :ref:`GDScript 참조<doc_gdscript>`를 참조하세요.
더 보기
To learn more about C#, head to the C# basics page.
프로젝트 설정하기
Please create a new project to start with a clean slate. Your project should contain one picture: the Godot icon, which we often use for prototyping in the community.
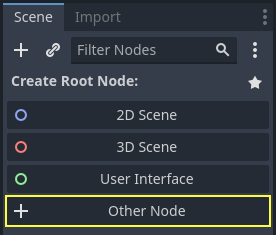
We need to create a Sprite2D node to display it in the game. In the Scene dock, click the Other Node button.
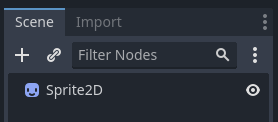
Type "Sprite2D" in the search bar to filter nodes and double-click on Sprite2D to create the node.
Your Scene tab should now only have a Sprite2D node.
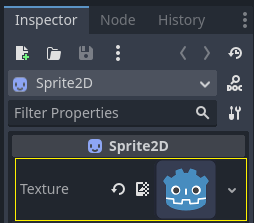
A Sprite2D node needs a texture to display. In the Inspector on the right, you
can see that the Texture property says "[empty]". To display the Godot icon,
click and drag the file icon.svg from the FileSystem dock onto the Texture
slot.
참고
You can create Sprite2D nodes automatically by dragging and dropping images on the viewport.
그런 다음 뷰포트에서 아이콘을 클릭하고 드래그하여 게임 뷰 중앙에 배치합니다.
Creating a new script
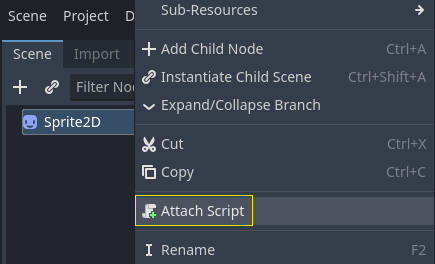
To create and attach a new script to our node, right-click on Sprite2D in the scene dock and select "Attach Script".
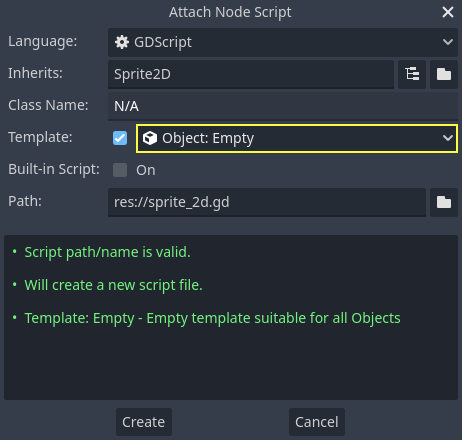
The Attach Node Script window appears. It allows you to select the script's language and file path, among other options.
Change the Template field from "Node: Default" to "Object: Empty" to start with a clean file. Leave the other options set to their default values and click the Create button to create the script.
참고
C# script names need to match their class name. In this case, you should name the
file MySprite2D.cs.
The Script workspace should appear with your new sprite_2d.gd file open and
the following line of code:
extends Sprite2D
using Godot;

public partial class MySprite2D : Sprite2D
{
}
Every GDScript file is implicitly a class. The extends keyword defines the
class this script inherits or extends. In this case, it's Sprite2D, meaning
our script will get access to all the properties and functions of the Sprite2D
node, including classes it extends, like Node2D, CanvasItem, and
Node.
참고
In GDScript, if you omit the line with the extends keyword, your
class will implicitly extend RefCounted, which
Godot uses to manage your application's memory.
상속된 속성에는 노드의 ``텍스처``와 같이 인스펙터 독에서 볼 수 있는 속성이 포함됩니다.
참고
기본적으로 인스펙터는 노드의 속성을 "Title Case"(공백으로 구분되며 대문자로 시작하는 단어 형태)로 표시합니다. GDScript 코드에서 이러한 속성은 "snake_case"(밑줄로 구분되며 소문자로 이루어진 단어 형태)로 표기됩니다.
You can hover over any property's name in the Inspector to see a description and its identifier in code.
Hello, world!
우리 스크립트는 현재 아무것도 하지 않습니다. 시작으로 하단의 Output 패널에 "Hello, world!"라는 텍스트를 출력해 보겠습니다.
다음 코드를 스크립트에 추가하세요:
func _init():
    print("Hello, world!")
public MySprite2D()
{
    GD.Print("Hello, world!");
}
내용을 분석해 봅시다. func 키워드는 ``_init``이라는 이름의 새로운 함수를 정의합니다. 이는 우리 클래스 생성자에서 사용하는 특별한 이름입니다. 이 함수를 정의하면 엔진은 메모리에 생성된 모든 개체나 노드에 대해 ``_init()``를 호출합니다.
참고
GDScript는 들여쓰기 기반의 언어입니다. ``print()``가 작성된 라인의 시작 부분의 탭은 코드가 동작하기 위해 반드시 필요합니다. 이를 생략하거나 줄을 알맞게 들여쓰지 않으면 편집기에서 해당 항목을 빨간색으로 강조 표시하고 다음과 같은 오류 메시지를 표시합니다:"들여쓰기 된 블록이 필요합니다".
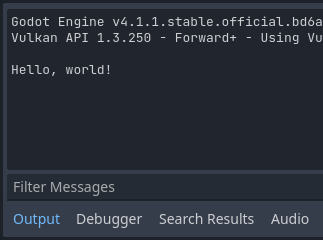
Save the scene as sprite_2d.tscn if you haven't already, then press F6 (Cmd + R on macOS)
to run it. Look at the Output bottom panel that expands.
It should display "Hello, world!".
Delete the _init() function, so you're only left with the line extends
Sprite2D.
되돌아보기
It's time to make our node move and rotate. To do so, we're going to add two
member variables to our script: the movement speed in pixels per second and the
angular speed in radians per second. Add the following after the extends Sprite2D line.
var speed = 400
var angular_speed = PI
private int _speed = 400;
private float _angularSpeed = Mathf.Pi;
멤버 변수는 스크립트 상단 부근의 "extends" 줄 보다는 뒤에, 함수 보다는 앞에 위치합니다. 이 스크립트가 첨부된 모든 노드 인스턴스는 speed 및 angular_speed 속성의 복사본을 갖게 됩니다.
참고
Godot에서 각도는 기본적으로 라디안으로 동작하지만, 각도를 도 단위로 계산하는 것을 선호하는 경우 사용할 수 있는 내장 함수와 속성도 있습니다.
To move our icon, we need to update its position and rotation every frame in the
game loop. We can use the _process() virtual function of the Node class.
If you define it in any class that extends the Node class, like Sprite2D, Godot
will call the function every frame and pass it an argument named delta, the
time elapsed since the last frame.
참고
게임은 초당 많은 이미지(각각을 프레임이라 부름)를 렌더링하는 방식으로 작동하며, 반복해서 동작합니다. 우리는 초당 프레임 수(FPS)로 게임이 이미지를 생성하는 속도를 측정합니다. 대부분의 게임은 60FPS를 목표로 하지만 느린 모바일 장치에서는 30FPS, 가상 현실 게임에서는 90~240FPS와 정도의 수치를 볼 수 있습니다.
엔진과 게임 개발자는 일정한 시간 간격으로 게임 세계를 업데이트하고 이미지를 렌더링하기 위해 최선을 다하지만, 프레임 렌더링 시간에는 항상 작은 차이가 있습니다. 이것이 바로 엔진이 우리에게 델타 시간 값을 제공하여 움직임을 프레임 속도와 독립적으로 만드는 이유입니다.
스크립트 하단에, 아래와 같은 함수를 정의합니다:
func _process(delta):
rotation += angular_speed * delta
public override void _Process(double delta)
{
Rotation += _angularSpeed * (float)delta;
}
func 키워드는 새로운 함수를 정의합니다. 이 키워드 뒤에는 함수의 이름과 인수를 괄호 안에 적어야 합니다. 콜론으로 정의를 끝내고, 이후의 들여쓰기 된 블록은 함수의 내용이나 명령입니다.
참고
``_init()``과 마찬가지로 ``_process()``가 밑줄로 시작한다는 걸 주목하세요. 관례적으로, Godot의 가상 함수, 즉 엔진과 통신하기 위해 오버라이딩 할 수 있는 내장 함수는 밑줄로 시작합니다.
The line inside the function, rotation += angular_speed * delta, increments
our sprite's rotation every frame. Here, rotation is a property inherited
from the class Node2D, which Sprite2D extends. It controls the rotation
of our node and works with radians.
팁
코드 에디터에서, position, rotation 또는 ``_process``와 같은 내장된 속성 혹은 함수 위에서 Ctrl + 클릭을 하면 관련된 문서가 새로운 탭으로 나타납니다.
씬을 실행하여 Godot 아이콘이 제자리에서 돌아가는 것을 확인하세요.

참고
In C#, notice how the delta argument taken by _Process() is a
double. We therefore need to convert it to float when we apply
it to the rotation.
Moving forward
Let's now make the node move. Add the following two lines inside of the _process()
function, ensuring the new lines are indented the same way as the rotation += angular_speed * delta line before
them.
var velocity = Vector2.UP.rotated(rotation) * speed
position += velocity * delta
var velocity = Vector2.Up.Rotated(Rotation) * _speed;
Position += velocity * (float)delta;
이미 살펴보았듯이 var 키워드는 새로운 변수를 정의합니다. 이를 스크립트 상단에 넣으면, 클래스의 속성을 정의합니다. 함수 내부에서는 지역 변수(함수 범위 내에서만 존재)를 정의합니다.
We define a local variable named velocity, a 2D vector representing both a
direction and a speed. To make the node move forward, we start from the Vector2
class's constant Vector2.UP, a vector pointing up, and rotate it by calling the
Vector2 method rotated(). This expression, Vector2.UP.rotated(rotation),
is a vector pointing forward relative to our icon. Multiplied by our speed
property, it gives us a velocity we can use to move the node forward.
노드의 ``position``에 ``velocity * delta``를 더하여 이동합니다. position 자체는 2D 벡터를 나타내는 Godot에 내장된 타입인 Vector2 타입입니다.
씬을 실행하여 Godot 머리가 원을 그리며 움직이는 것을 확인하세요.
참고
지금의 노드 이동은 벽이나 바닥과의 충돌을 고려하지 않고 있습니다. :ref:`doc_your_first_2d_game`에서는 충돌을 감지하면서 물체를 움직이는 또 다른 접근 방식을 배워볼 것입니다.
Our node currently moves by itself. In the next part, Listening to player input, we'll use player input to control it.
Complete script
Here is the complete sprite_2d.gd file for reference.
extends
Sprite2D
var speed = 400
var angular_speed = PI
func _process(delta):
rotation += angular_speed * delta
var velocity = Vector2.UP.rotated(rotation) * speed
position += velocity * delta
using Godot;
public partial class MySprite2D : Sprite2D
{
private int _speed = 400;
private float _angularSpeed = Mathf.Pi;
public override void _Process(double delta)
{
Rotation += _angularSpeed * (float)delta;
var velocity = Vector2.Up.Rotated(Rotation) * _speed;

Position += velocity * (float)delta;
}
}