Up to date
This page is up to date for Godot 4.2.
If you still find outdated information, please open an issue.
2D sprite animation
소개
In this tutorial, you'll learn how to create 2D animated characters with the AnimatedSprite2D class and the AnimationPlayer. Typically, when you create or download an animated character, it will come in one of two ways: as individual images or as a single sprite sheet containing all the animation's frames. Both can be animated in Godot with the AnimatedSprite2D class.
First, we'll use AnimatedSprite2D to animate a collection of individual images. Then we will animate a sprite sheet using this class. Finally, we will learn another way to animate a sprite sheet with AnimationPlayer and the Animation property of Sprite2D.
참고
Art for the following examples by https://opengameart.org/users/ansimuz and tgfcoder.
Individual images with AnimatedSprite2D
In this scenario, you have a collection of images, each containing one of your character's animation frames. For this example, we'll use the following animation:

You can download the images here: 2d_sprite_animation_assets.zip
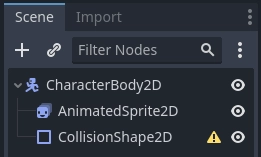
이미지 압축을 풀고 당신의 프로젝트 폴더에 넣으세요. 다음과 같은 노드를 씬 트리에 설정하세요:
참고
The root node could also be Area2D or RigidBody2D. The animation will still be made in the same way. Once the animation is completed, you can assign a shape to the CollisionShape2D. See Physics Introduction for more information.
Now select the AnimatedSprite2D and in its SpriteFrames property, select
"New SpriteFrames".
새 SpriteFrames 리소스를 클릭하면 편집기 창 하단에 새로운 패널이 나타날 것입니다:
왼쪽의 파일 시스템 독에서 8개의 개별 이미지를 SpriteFrames 패널의 중앙 부분으로 끌어다 놓으세요. 왼쪽에서 애니메이션의 이름을 "default"에서 "run"으로 변경하세요.
Use the "Play" buttons on the top-right of the Filter Animations input to preview the animation. You should now see the animation playing in the viewport. However, it is a bit slow. To fix this, change the Speed (FPS) setting in the SpriteFrames panel to 10.
You can add additional animations by clicking the "Add Animation" button and adding additional images.
애니메이션 제어하기
애니메이션을 완성하면 play() 와 stop() 메서드를 사용하여 코드로 애니메이션을 제어할 수 있습니다. 여기 오른쪽 화살표 키를 누르고 있으면 애니메이션을 재생하고 떼면 중지하는 간단한 예제가 있습니다.
extends CharacterBody2D

@onready var _animated_sprite = $AnimatedSprite2D

func _process(_delta):
    if Input.is_action_pressed("ui_right"):
        _animated_sprite.play("run")
    else:
        _animated_sprite.stop()
using Godot;

public partial class Character : CharacterBody2D
{
    private AnimatedSprite2D _animatedSprite;

    public override void _Ready()
    {
        _animatedSprite = GetNode<AnimatedSprite>("AnimatedSprite");
    }

    public override _Process(float _delta)
    {
        if (Input.IsActionPressed("ui_right"))
        {
            _animatedSprite.Play("run");
        }
        else
        {
            _animatedSprite.Stop();
        }
    }
}
Sprite sheet with AnimatedSprite2D
You can also easily animate from a sprite sheet with the class AnimatedSprite2D.
We will use this public domain sprite sheet:
Right-click the image and choose "Save Image As" to download it, and then copy the image into your project folder.
Set up your scene tree the same way you did previously when using individual images.
Select the AnimatedSprite2D and in its SpriteFrames property, select "New SpriteFrames".
Click on the new SpriteFrames resource. This time, when the bottom panel appears, select "Add frames from a Sprite Sheet".
You will be prompted to open a file. Select your sprite sheet.
A new window will open, showing your sprite sheet. The first thing you will need to do is to change the number of vertical and horizontal images in your sprite sheet. In this sprite sheet, we have four images horizontally and two images vertically.
Next, select the frames from the sprite sheet that you want to include in your animation. We will select the top four, then click "Add 4 frames" to create the animation.
You will now see your animation under the list of animations in the bottom panel. Double click on default to change the name of the animation to jump.
Finally, check the play button on the SpriteFrames editor to see your frog jump!
Sprite sheet with AnimationPlayer
Another way that you can animate when using a sprite sheet is to use a standard Sprite2D node to display the texture, and then animating the change from texture to texture with AnimationPlayer.
6개의 애니메이션 프레임이 포함된 스프라이트 시트를 고려하세요:

오른쪽 마우스 버튼으로 이미지를 클릭하고 "다른 이름으로 저장" 선택해서 다운로드 하세요. 그 다음 당신의 프로젝트 폴더에 이미지를 복사하세요.
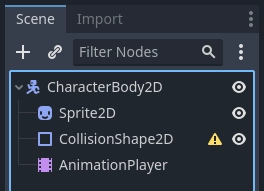
우리의 목표는 이 이미지들을 차례로 반복해서 보여주는 것입니다. 다음과 같이 씬 트리를 설정하여 시작하세요:
참고
The root node could also be Area2D or RigidBody2D. The animation will still be made in the same way. Once the animation is completed, you can assign a shape to the CollisionShape2D. See Physics Introduction for more information.
스프라이트 시트를 스프라이트의 Texture 속성에 끌어 놓으면 전체 시트가 화면에 보여집니다. 개별 프레임으로 자르려면 인스펙터(Inspecter)에서 Animation 부분을 확장하고 Hframes 을 6 으로 설정하세요. Hframes 와 Vframes 는 스프라이트 시트에서 수평 및 수직 프레임의 수입니다.

Now try changing the value of the Frame property. You'll see that it ranges
from 0 to 5 and the image displayed by the Sprite2D changes accordingly.
This is the property we'll be animating.
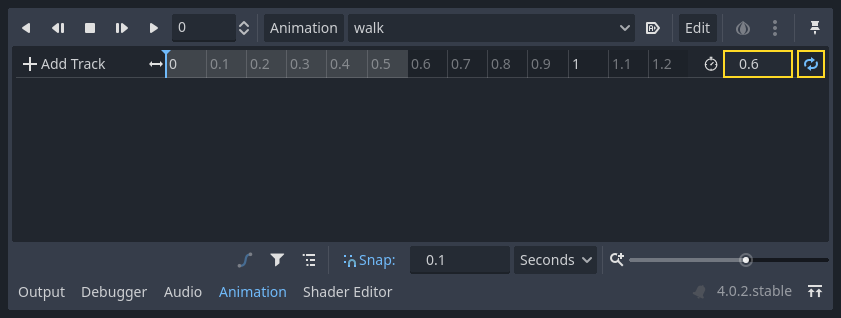
AnimationPlayer 를 선택하고 "애니메이션" 버튼을 클릭한 다음 "새 파일"을 클릭하세요. 새 애니메이션을 "walk"로 이름을 지으세요. 애니메이션 길이를 0.6 로 설정하고 "Loop" 버튼을 클릭해서 애니메이션이 반복되도록 하세요.
Now select the Sprite2D node and click the key icon to add a new track.

Continue adding frames at each point in the timeline (0.1 seconds by
default), until you have all the frames from 0 to 5. You'll see the frames
actually appearing in the animation track:

애니메이션에서 "Play" 를 누르고 어떻게 작동하는지 보세요.
Controlling an AnimationPlayer animation
Like with AnimatedSprite2D, you can control the animation via code using
the play() and stop() methods. Again, here is an example to play the
animation while the right arrow key is held, and stop it when the key is
released.
extends CharacterBody2D

@onready var _animation_player = $AnimationPlayer

func _process(_delta):
    if Input.is_action_pressed("ui_right"):
        _animation_player.play("walk")
    else:
        _animation_player.stop()
using Godot;

public partial class Character : CharacterBody2D
{
    private AnimationPlayer _animationPlayer;

    public override void _Ready()
    {
        _animationPlayer = GetNode<AnimationPlayer>("AnimationPlayer");
    }

    public override void _Process(float _delta)
    {
        if (Input.IsActionPressed("ui_right"))
        {
            _animationPlayer.Play("walk");
        }
        else
        {
            _animationPlayer.Stop();
        }
    }
}
참고
If updating both an animation and a separate property at once
(for example, a platformer may update the sprite's h_flip/v_flip
properties when a character turns while starting a 'turning' animation),
it's important to keep in mind that play() isn't applied instantly.
Instead, it's applied the next time the AnimationPlayer is processed.
This may end up being on the next frame, causing a 'glitch' frame,
where the property change was applied but the animation was not.
If this turns out to be a problem, after calling play(), you can call advance(0)
to update the animation immediately.
요약
These examples illustrate the two classes you can use in Godot for 2D animation.
AnimationPlayer is a bit more complex than AnimatedSprite2D,
but it provides additional functionality, since you can also
animate other properties like position or scale.
The class AnimationPlayer can also be used with an AnimatedSprite2D.
Experiment to see what works best for your needs.