Attention: Here be dragons
This is the latest
(unstable) version of this documentation, which may document features
not available in or compatible with released stable versions of Godot.
Checking the stable version of the documentation...
Android로 배포하기
설정
대부분의 독립형 헤드셋은 Android에서 OpenXR의 플랫폼 지원에 의해 동작합니다.
OpenXR에 관한 설명을 진행하기 전에, 일반적으로 Android 장치에 내보내기 위한 시스템 설정을 우선 진행해야 합니다:
OpenJDK 11 설치
Android Studio 설치
Godot에서 Android SDK의 위치 구성하기
과정 전체에 대한 세부 사항은 Android로 내보내기 문서를 살펴 보시고, 위 과정들이 끝나면 다시 돌아와 이 문서를 보시기 바랍니다.
경고
모바일 Vulkan 렌더러는 여러 모바일 장치에 대한 다양한 최적화를 수행하는데, 우리는 아직 몇 가지 문제를 해결 중에 있습니다. 문제가 해결되기 전까지는 Android 기반의 XR 장치를 위해서는 compatiblilty 렌더러(OpenGL)을 사용하는 것을 강력히 추천합니다.
Gradle Android 빌드
참고
OpenXR에는 원래 공식적으로는 Android 플랫폼에 대한 지원이 없기 때문에 각 벤더들이 본인들의 헤드셋에서 OpenXR이 사용 가능하도록 커스텀 로더들을 만들게 되었습니다. 장기적으로 보면 모든 벤더들이 공식 OpenXR 로더를 도입하겠지만, 지금은 이 로더들을 프로젝트에서 설정해 주어야 합니다.
프로젝트에 제조사(벤더)별 OpenXR 로더를 추가하기 위해서는 gradle Android 빌드를 설정해야 합니다.
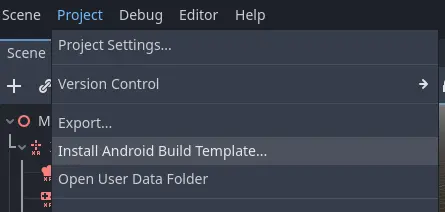
프로젝트 메뉴에서 Android 빌드 템플릿 설치...를 선택합니다:
이를 통해 프로젝트에 android 폴더가 생성되고, 그 안에 Android에 필요한 런타임 파일들이 들어 있게 됩니다. 이제 이 설치된 파일들을 수정할 수 있습니다. Godot 편집기에서 이것들을 보여주지는 않지만 파일 브라우저를 통해 살펴볼 수 있습니다.
Gradle 빌드에 관해서는 Android 용 맞춤 빌드 를 읽어보세요.
벤더 플러그인 설치
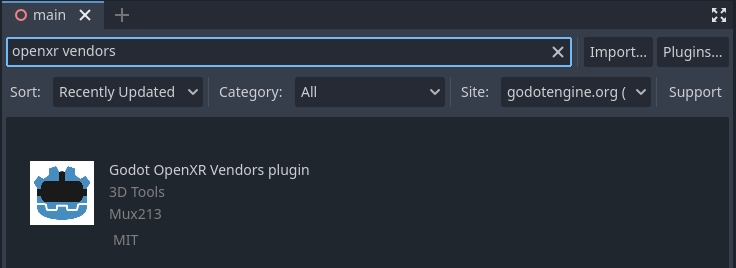
The vendors plugin can be downloaded from the Asset Store, search for "OpenXR vendors".
또는, 이 페이지에서 v2.x 버전의 플러그인을 다운로드하여 직접 벤더 플러그인을 설치하셔도 됩니다.
벤더 플러그인의 메인 저장소는 `여기<https://github.com/GodotVR/godot_openxr_vendors>`__ 입니다.
참고
Godot 4.6부터 공급업체 플러그인은 이제 선택 사항이지만 권장되는 플러그인입니다. Godot는 대부분의 Android 호환 장치로 직접 내보낼 수 있습니다. 이는 단일 APK를 여러 기기에 배포할 수 있는 데모 및 튜토리얼 프로젝트에 유용할 수 있습니다. 공급업체 플러그인은 공급업체별 구현 및 설정을 잠금 해제하며 앱 스토어에 출시해야 할 수도 있습니다.
내보내기 프리셋 생성
각 장치는 각자의 로더가 포함되어야 하므로 장치마다 별도의 내보내기 프리셋을 설정해야 합니다.
프로젝트를 열고 내보내기를 선택한 뒤, 추가 버튼을 누르고 Android를 선택하세요. 그리고 대상으로 하는 장치를 위한 내보내기 프리셋의 이름을 설정하세요. 예를 들어 Meta Quest와 같이요. 그리고 Gradle 빌드 사용을 활성화하세요. 원클릭 배포를 사용하려면 실행 가능이 활성화되어 있는지 확인하세요.
벤더 플러그인이 올바로 설치되었다면 여러 헤드셋 항목이 보일 것이고, Meta를 선택하세요:
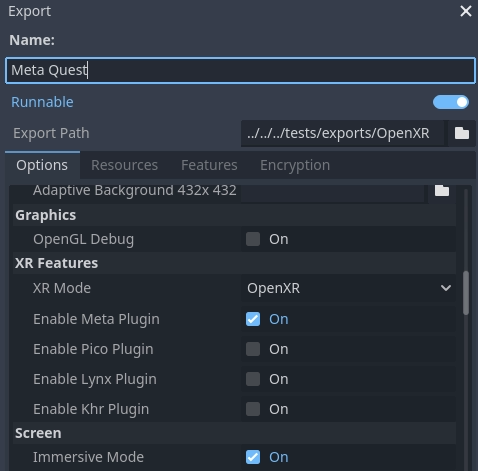
목록의 아래 쪽으로 내려가 보면 추가적인 XR 기능 항목이 있는데, 지금은 **Meta XR Features**만 활성화되어 있습니다. 핸드 트래킹과 패스쓰루 설정은 Meta Quest 장치에서만 가능하고, 이러한 기능을 활용하고자 한다면 필요한 항목을 선택해야 합니다.
Godot 편집기에서 기기 실행하기
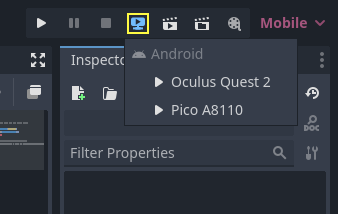
앞서 설명한 것처럼 내보내기를 설정했고, 헤드셋이 올바로 컴퓨터에서 인식된 상태라면 Godot 편집기의 원 클릭 배포를 통해 바로 실행할 수 있습니다:
몇몇 플랫폼이나 장치에서는 장치를 올바로 인식시키기 위해 몇 가지 과정이 더 필요할 수 있습니다. 따라서 헤드셋 제조사의 개발자 문서를 잘 읽어 보시기 바랍니다.
예를 들어, Meta Quest 2의 경우 헤드셋에서 개발자 모드를 활성화해야 하며, Windows에서의 경우 특수 ADB 드라이버를 설치해야 합니다. 자세한 사항은 공식 Meta Quest 개발자 문서를 참조하세요.
원 클릭 배포에 문제가 있으면 문제 해결 섹션을 확인하세요.